Tuesday 31 December 2013

I.MX6 Debian Jessie (GPU/VPU) 3.10.9-1.0.0

Following on from the Xubuntu 13.04 rootfs which previewed GPU acceleration beyond Xorg 11, here is a Debian Jessie/Sid rootfs which has support for both GPU and VPU acceleration using the alpha 3.10.9-1.0.0 FSL (freescale) libraries. This armhf rootfs fires up a xfce desktop and has been validated against a 3.0.35-4.1.0 kernel.


Given the fact the 3.10.9-1.0.0 libraries are in an alpha this rootfs should also be treated as alpha quality i.e not everything you expect to work does! Another important point to mention is gstreamer support,  the existing VPU libraries make use of plugins for gstreamer 0.10 while Jessie has moved onto gstreamer 1.0 and currently it is not clear how/if Freescale will address this.  There is a 1.0 plugin that Carlos has bravely been working towards which I have included in the build again treat this as alpha quality. Give the state of the gstreamer plugins I haven't found an easily way to add support for totem or parole.

As per my previous releases this rootfs should run on most imx6d/q devices given a valid uboot and kernel (at least 4.1.0) , see my previous blog for the vivante patch. In order to reduce the image size, this is a minimal rootfs with just a few basic xfce/lxde applications installed (no browser). You can revert to a console boot if xfce/lxde is not required, see later part of the instructions below.

I have tested this rootfs on a Utilite Pro using this kernel and on a UDOO using this kernel. Many thanks to hste (aka Haakon Stende) for sanity testing on his GK802 and hosting my files. Courtesy of hste you also have the option of a lxde rootfs.

  • Additional instructions for UDOO can be found here along a SD card image. Furthermore I have verified that is possible to run the UDOO Arduino IDE on this rootfs. Albeit it requires a few changes to be make the IDE launch and compile, instructions are provided in the link.
  • For cubox-i Rabeeh has created a SD card image see here.
  • For all other devices use the instructions below:

1. Download the rootfs xfce or lxde and extract onto your media (for lxde see comments for tar command).

2. If you require serial console output then edit /etc/inittab and include an additional line at the end of the file for tty output as below, replacing <ttymxc> with  the correct serial port for your device. For example for UDOO it is ttymxc1 and for Utilite it is ttymxc3

    T0:23:respawn:/sbin/getty -L <ttymxc> 115200

3. By default no networking is configured, you will need to setup networking access as per your requirements. If you have ethernet then you can run  'dhclient eth0'.

4. On a successful boot you should be presented with the lightdm greeter logon screen. The default user is 'debian' and matching password.

5.  To test GPU acceleration open a terminal and run glxgear, es2gear, glmark2 and glmarks2-es2. Given the limited Open GL support provided by the Vivante libraries don't expect all applications to use GPU acceleration.

6. To test VPU support using the gstreamer0.10 plugins you can either:

  • Run gplay with a media file. The main drawback is there is no playback controls to pause/stop/forward/rewind video.
  • Thanks to the ingenuity of htse, I have included the video player from a yocto build which provides file selection and playback controls. To launch:
            video-player.sh

Note: video-player.sh doesn't repaint the on-screen controls, therefore it  requires the mouse to be moved over the controls for repainting to occur.

7. To test VPU using the gstreamer1.0 plugin, I have included a script thats launches playbin:

    gst-1.0-playbin.sh <media file>

Note: if you attempt to close the window early, playbin continues to runs and only the display output is halted. To correctly close early kill the playbin process.

8. I encountered problems with xfce-mixer not correctly detecting multiple sound cards (eg on the Utilte Pro). To test sound is correctly configured I have included a sample wav (paino2.wav) file. To test sound output run:

   aplay paino2.wav

If you don't hear sound, run 'aplay -l' to list the sound devices detected by alsa. To run aplay against the correct device you can pass the sound card and device number listed by 'aplay -l' to the aplay command, example below (2 is card and 0 is the device):

   aplay hw:2,0 piano2.wav

To set the default sound device you can create the following entries in/etc/asound.conf. Replacing 'card' and 'device' with the correct values.

  defaults.Master.card 2
  defaults.Master.device 0
  defaults.pcm.card 2
  defaults.pcm.device 0
  defaults.ctl.card 2
  defaults.ctl.device 0


9. As per my last blog because we are replacing the mesa libraries with Vivante equivalents, any package updates for the mesa libraries will break GPU acceleration. If you plan to compile natively, this potentially may result in compilation breakages which rely on the mesa headers. As a work around you  could reinstall the mesa packages to obtain the correct headers, compile and then move the mesa shared libraries out the way again.

10. For root access password is same as user.

11. To revert to a console boot, you can disable lightdm from auto starting by:

   update-rc.d lightdm disable


If you require more help try the irc channel imx6-dev (was know as imx6-dongle).

Monday 28 October 2013

I.MX6 Ubuntu 13.04 Debugging GPU Acceleration

You've probably reached here because your having problems getting the rootfs in my previous post to work for X11. So here some debugging tips to help you out:

1. The kernel I used is 4.1.0  and can be found in my repo and is a branch of the FSL repo. An additional patch to set the correct busid for the vivante driver may need to be made if not present in the kernel:

--- a/drivers/gpu/drm/vivante/vivante_drv.c
+++ b/drivers/gpu/drm/vivante/vivante_drv.c
@@ -55,7 +55,7 @@

#include "drm_pciids.h"

-static char platformdevicename[] = "Vivante GCCore";
+static char platformdevicename[] = "Vivante GCCore:00";
static struct platform_device *pplatformdev;

static struct drm_driver driver = {

Here is my  defconfig (I'm compiling for a custom board). Note: the FSL patch (ENGR00264288-1) to upgrade the Vivante libraries to 4.6.9p12.

2. Once you have a booting kernel, you should first test that kernel works against the Vivante framebuffer libraries. To do this we simply switch to the fb libraries (need to be root):

cd /usr/lib
rm libEGL.so.1.0 libEGL.so.1 libEGL.so
ln -s libEGL-fb.so libEGL.so.1.0
ln -s libEGL-fb.so libEGL.so.1
ln -s libEGL-fb.so libEGL.so 

rm libGAL.so
ln -s libGAL-fb.so libGAL.so

rm libVIVANTE.so 
ln -s libVIVANTE-fb.so libVIVANTE.so 

Now test with one of the Vivante tutorial examples (pick any of the tutorials)

cd /root/gpu-viv-bin-mx6q-3.5.7-1.0.0-alpha.2-hfp/opt/viv_samples/vdk
./tutorial7

If the tutorial doesn't run it may indicate there is a mismatch between the kernel Vivante code and the libraries or the Vivante libraries may be missing a dependency.

3. If everything is fine with the framebuffer libraries we can now switch back to x11:

cd /usr/lib

rm libEGL.so.1.0 libEGL.so.1 libEGL.so
ln -s libEGL-x11.so libEGL.so.1.0
ln -s libEGL-x11.so libEGL.so.1
ln -s libEGL-x11.so libEGL.so 

rm libGAL.so
ln -s libGAL-x11.so libGAL.so

rm libVIVANTE.so 
ln -s libVIVANTE-x11.so libVIVANTE.so 

Now reboot.

4. Before we test with X, we need to check that kernel vivante/drm modules are loaded:

root@ubuntu-imx6:~# lsmod
Module                  Size  Used by
vivante                  947  1 
drm                   137567  2 vivante

If the modules aren't loaded then X will revert to software rendering because the device /dev/dri/card0 does not exist. The loading of the module is configured in /etc/modules

5. I suggest starting a simple X server to test that the Vivante drivers get correctly loaded:

startx &

The output of the /var/log/Xorg.0.log should be similar to this. If errors are reported it may be because:

1. The vivante kernel module didn't load
2. Check the exa driver is present /usr/lib/xorg/modules/drivers/vivante_drv.so
3. Least likely, missing permissions on the gpu device, these should be setup in  /etc/udev/rules.d/10-imx.rules.

6. Validate the output of glxinfo and es2_info (they should show the presence of the Vivante drivers):

export DISPLAY=:0
glxinfo
es2_info

If you are not seeing "OpenGL renderer string: GC2000 Graphics Engine" and/or "EGL_VENDOR = Vivante Corporation" in the output then it may be possible that the mesa libraries are being picked up. If the directories /usr/lib/arm-linux-gnueabihf/mesa and/or /usr/lib/arm-linux-gnueabihf/mesa-egl are present then move these to another location. They shouldn't be present on my rootfs unless the mesa packages were reinstalled.


Sunday 27 October 2013

I.MX6 - Ubuntu 13.04 with GPU acceleration

One of the main drawbacks with the existing freescale BSP releases (up to 4.1.0) was the lack of support beyond xorg-server version 11. This was due to lack of support within the Vivante GPU libraries. With the introduction of a new BSP based on kernel 3.5.7,  it is finally possible to build support for xorg-server beyond version 11. The added bonus is support for armhf, however this is offset by the fact that the Vivante libraries are currently marked as alpha.


I've put together a preview Xubuntu Raring (13.04) rootfs to demonstrate this, 13.04 is based on xorg-server 13.3. Sadly there no video acceleration, this is work in progress, the major hurdle is that existing fsl gstreamer plugins are coded against 0.10 and there are compatibility issues with a later GLib version. The short video above gives an indication of how the libraries performs (video shows running  glmark2-es2,  vivante sdk sample and the 3D game Neverball at 720p). Note, not all OpenGL applications (eg FireFox) are compatible with the Vivante libraries because of limited API.

The rootfs has been updated to use the latest Vivante libraries producing better performance figures for OpenGL.

The origins of my rootfs is this minimal console rootfs  which I think was put together by Robert Nelson (this has no GPU/VPU support). My rootfs is fairly clean, sanitised and contains a minimal xbuntu installation. The intention was include just enough to get an accelerated desktop functioning and for the rest to be customised depending on the target device.

Another goal was to make the rootfs available to be deployable to any i.mx6 device. It should be possible to deploy this to any i.mx6 device (eg boundarydevices, wandboard, utilite, udoo, cubox-i) assuming it contains a dual or quad processor. By the way I don't own any of the mentioned devices but glad to accept hardware donations. All you require is a working uboot and kernel (4.1.0) or (3.5.7). I haven't tested again a 3.5.7 kernel, furthermore it may be possible to run against a later kernel again not tested. If you plan to derive a new rootfs from mine, please acknowledge the author.

Extract the rootfs to your designated media and copy your kernel and modules as required. The rootfs is configured to output to the serial console with auto-logon for root. By default the image boots to display a console logon prompt, if hdmi is configured. The user and password are 'ubuntu'.

Xfce4 is not configured to auto start, you can start it by:

service lightdm start

If you require auto start, remove lightdm override:

rm /etc/init/lightdm.override

You will need to configure networking as per your requirements. I decided not to install network-manager due the dependencies on gnome. You may need to edit the nameserver entry in /etc/resolvconf/resolv.conf.d/tail .

The mesa utilities glxgears,es2gears, glmark2, glmark2-es2 are pre-installed. glmark2 will end after the jellyfish demo with a segmentation fault.

The Vivante samples are located in /root/gpu-viv-bin-mx6q-3.10.9-1.0.0-hfp/opt/viv_samples.

If your deployment fails to run X, then my next post has some debugging steps. Also available to answer questions  IRC Freenode #imx6-dongle

Sunday 1 September 2013

Mixtile - Exynos 4412 Development Board

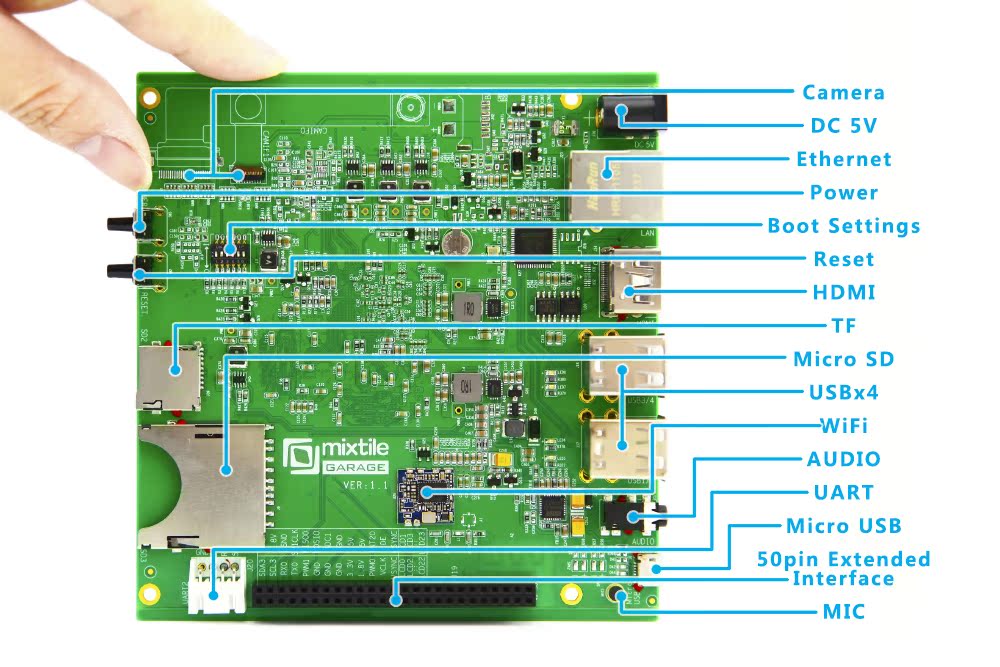
As most of you are aware there are plenty of ARM development boards to choose from, well here is a another one to add to the growing list. It's known as Mixtile (Chinese name: m too)  and is promoted as a low cost Quad Core board deploying Samung's Exynos 4412 (1.4GHz) processor accompanied with 1GB RAM, all for $79 (excluding shipping). It originates from China and surprisingly the schematics are freely available.

The board itself is large (12cm x 12cm) and I guess similarities would be drawn against Hardkernels older offerings namely ORDROID-U/X. The major differentiator is the plethora of on-board ports and I/O:

Sadly there's no SATA port but the 50 pin dual header (2.54mm)  supports I2C, SPI, ADC, PWM, Serial and I think an LCD interface (haven't verified these are working). The downside is that the I/O is probably 1.8v and sourcing a 3.3v/5v level shifter may not be easy. Furthermore what's unclear is how well these interfaces are supported in the kernel source. The 2.54mm pitch is ideal because the connectors are cheap and readily available. Quite a few of the peripheral ports (wifi, ethernet, SD cards, usb) are driven from 2 USB controllers, a SMC USB4640 and a LAN9514. It will be interesting to see if there are noticeable bottlenecks as the controllers are daisy chained. Audio support is provided by a WM8960, with the board providing a headphone jack and on board microphone. There are also solder pads for connecting a pair of speakers, the WM8960 datasheet indicates 1Watt output.

The board requires a 5v power supply and protection is provided by an on board fuse. By default the board boots from the micro sd slot, apparently it is possible to reconfigure the boot device through DIP switches although I couldn't find any documentation describing the settings. Although not obvious there are a number of LED's populated on both the front and back of the PCB. Once the board is powered 4 bright green LED light up indicating the 4 USB ports are powered. I have no idea of their relevance, however they are an irritation giving the level of brightness emitted. I also noticed some LEDs  on the underside of the PCB, again I can't see the purpose as that part of the board is not directly visible.


Another oddity is the location of the 4412 processor, its on the back of the PCB. Giving that the processor probably requires some level of cooling, it would indicate the PCB should be mounted using spacers/pillar so that air can flow to the underside of the PCB. Therefore it is advisable to have some pcb spacers handy if your planning to purchase. Fortunately I located some spare brass hex pillars that matched the mounting holes. I suspect the processor will also require some kind of passive cooling although there are no mounting holes or points to affix one.


To access the serial console you require a USB to TTL Serial Adapter which supports 1.8v these can be difficult to source and expensive.

Currently there is pre-view Android and Ubuntu (no h/w acceleration) images available for download, along with uboot and kernel source. I gave the ubuntu image a quick test, however to do so I needed to set the HDMI resolution to 720P, by default it is set to 1080P in the kernel.

As a quick workaround to set 720p I changed the following line in drivers/media/video/exynos/tv/hdmi_drv.c .

#define HDMI_DEFAULT_PRESET V4L2_DV_1080P60                                                                   

to
                    
#define HDMI_DEFAULT_PRESET V4L2_DV_720P60

To compile the kernel for ubuntu, you need Sourcery G++ Lite  I used  2010.09-50 v4.5.1. 

To compile the kernel:

make ARCH=arm CROSS_COMPILE=arm-none-linux-gnueabi- mixtile_garage_ubuntu_defconfig

make ARCH=arm CROSS_COMPILE=arm-none-linux-gnueabi- menuconfig

make ARCH=arm CROSS_COMPILE=arm-none-linux-gnueabi-

make ARCH=arm CROSS_COMPILE=arm-none-linux-gnueabi- modules INSTALL_MOD_PATH=output

make ARCH=arm CROSS_COMPILE=arm-none-linux-gnueabi- modules_install INSTALL_MOD_PATH=output

To copy the kernel to the ubuntu SD card image (where <drive> is SD card device):

sudo dd if=arch/arm/boot/zImage of=/dev/<drive> bs=512 seek=6144; sync;

To copy the kernel modules, you would do something like this, where <mount path> is the path to SD card rootfs :

sudo cp -r output/lib/modules/3.0.15 /<mount path>/lib/module

The user and password for the ubuntu image is 'ubuntu'. The preview ubuntu image has a default Locale of Chinese, to change this edit /etc/default/locale. You also need to change the Language settings from within the Unity desktop. Select Settings->Language Support.

I did test a HDMI to VGA adapter at 720p and it ran fine against my monitor.

Given this is a fairly new board (albeit using an older processor), there seems to be little support available at present which can make it daunting and challenging at the same time.

Friday 17 May 2013

I.MX6 GK802 - Uboot multi-boot

I spent some re-factoring the current uboot to enable the possibility of booting a roofs located on either:

1. Internal SD
2. External SD
3. Usb drive

Here's how it works, the new boot searches for a uboot script file called "boot.scr" on each of the above devices. The boot.scr is loaded and executed from the first device it encounters containing the file. We assume the device contains an ext2/3/4 partition and the boot.scr is located in /. Within the boot.scr file the variable 'boot_normal' has to be set to contain the uboot commands to run next, the contents of this variable are then executed.

You can download multi-uboot from here and 'dd' to an sd card that will reside in the internal sd card slot. Potentially this can be a very small SD card if you have no intentions of hosting a rootfs on it.

sudo dd if=u-boot_multi_boot.imx bs=1k seek=1 of=/dev/<internal SD card device> && sync


Lets start with an example, lets say we want to execute our ubuntu image from the external SD card. I am assuming the ubuntu rootfs exists on an sd card . First we create a text file I call them 'boot.cmd' (you can give it any name) containing the uboot commands to run as shown below:

setenv console 'ttymxc3,115200'
setenv root '/dev/mmcblk1p1 rootwait'
setenv rootfstype 'ext4'
setenv kernel 'uImage'
setenv video 'mxcfb0:dev=hdmi,1280x720M@60,if=RGB24'
setenv extra ''
setenv boot_normal 'setenv bootargs console=${console} root=${root} rootfstype=${rootfstype} video=${video} ${extra};  mmc dev 1; ext2load mmc 1:1 0x10800000 /boot/uImage; bootm'

For the above :

1. 'root' is set to the external sd card (/dev/mmcblk1p1).
2. 'video' contains the video resolution we want the kernel to set. Note setting the resolution may disable sound. So you could remove the video variable from the file to let the kernel detect the resolution using EDID. There is also a kernel patch from wolfgar that fixes the sound when the resolution is set to 720p or 1080. You can download precompiled kernel and modules with the patch. Copy kernel (uImage) to /boot and untar modules_3.0.35-02708-g899792c-dirty.tar.gz and copy modules directory to /lib/modules.

3. 'boot_normal' is told to use the external sd slot by  'mmc dev 1' and then to load the kernel located at /boot/uImage.

Next the text file has to be converted to a uboot script image file using the mkimage command to create  the boot.scr file.

mkimage -A arm -O linux -T script -n "boot" -d boot.cmd boot.scr


Copy the boot.src to the root directory of your external sd card containing the rootfs.

Ensure internal sd slot has a the sd card containing the mutli-boot uboot on in it and does not contain a /boot.scr. Place the sd card containing the rootfs in the external sd card slot and boot.

Here are some example script files (remember to rename compiled file to boot.scr) :
Note the source files contain a mistake that should be fixed: 
     setenv fbmem "fbmem=28M";  
SHOULD BE  
    setenv fbmem ''; 

1. Boot from external SD (no video set)


2. Boot from from USB (assumes a single mass storage device is available).

3. Boot from internal SD (no video set)

Sunday 5 May 2013

I.MX6 GK802 Xubuntu 12.04

This is an attempt at producing at fast and lightweight desktop release based upon xfce. Given that the majority of the Debian based ARM desktop distros still rely on Open GL Window Managers, the desktop makes use of the Open GL Vivante library where possible. However as the Vivante libraries don't seem to support all the mesa-gl api's this works with limited success.

Ideally the next step would be to rework/recompile some of the applications to use GLES instead of Open GL or find desktop with GLES support.

Given this is a rootfs, it can be tested on other imx6 devices but no guarantees.

What is working:

1. GPU acceleration
2. Video playback using totem
3. Chromium (with GPU acceleration, webgl does not work)
4. Numerous desktop applications
5. Wifi

As per the previous ubuntu 12.04 image, to deploy:

1. Download roofs.

2. Extract rootfs onto your sdcard.


There is a bug in ubuntu with dbus disabling wifi (http://bugs.debian.org/cgi-bin/bugreport.cgi?bug=659953). After booting execute the following and reboot to configure wifi from within xfce:

chgrp messagebus /usr/lib/dbus-1.0/dbus-daemon-launch-helper
chmod +s /usr/lib/dbus-1.0/dbus-daemon-launch-helper 


You can also download the Vivante GPU demos, these demonstrate the performance of the GC2000 core. Extract the tar file and the samples are in located in "viv_samples/vdk", there are number  tutorial files that you can run eg "tutorial1, tutorial1_es20".

Thursday 4 April 2013

I.MX6 GK802 - Ubuntu 12.04 preview image

Following on from the oneiric preview image, I've put together a rootfs based on Linaro 12.04. Thanks to the Otavio from the yocto project for help building the gpu drivers. It should be possible to deploy the rootfs on other imx6 devices by deploying the correct uboot, kernel + modules.

Note: updated rootfs has working VPU.

What's working :

1. GPU + VPU acceleration.
2. Wifi
3. Choice of Unity 2D or Xubuntu desktop
4. Chromium
5. glxgears/glmark2-es2/es2gears working in Unity 2D and Xubuntu.

What's currently not working:

1. Bluetooth
2. Pre-installed Neverball (3D ball game) - broken something


If you prefer not to follow the manual instructions listed below user hste (aka
Haakon Stende
) on freenode imx6dongle has created a script to build and deploy. Script is here, any problems contact hste on freenode for advice.

To install (assuming oneiric image already on sd card):

1. Download rootfs linaro_12_04_gpu_vpu.tar.gz. Thanks to hste for hosting.
2. Delete existing rootfs from oneiric image (this is the "ubuntu" partition on the SD card).
 
    rm -rf <sd card mount point>/ubuntu/*
    sync

3. Extract new rootfs:

    cd <sd card mount point>/ubuntu
    tar xvf linaro_12_04_gpu.tar.gz
    sync

4.  Download kernel with cpu frequency or without (requires a good heatsink) and 'dd' to sd card.

    dd if=arch/arm/boot/uImage_cpufreq of=/dev/sdc bs=1048576 seek=1 && sudo sync 

         OR


    dd if=arch/arm/boot/uImage_no_cpufreq of=/dev/sdc bs=1048576 seek=1 && sudo sync 

5. Download uboot and 'dd' to sd card.
    dd if=u-boot.imx bs=1k seek=1 of=/dev/sdc && sync


4. Remove SD card and place in internal SD slot and power up.

Sunday 10 March 2013

GK802 - Ubuntu oneiric preview image


For those of you waiting for a pre-built image, here goes!

If you want to find out more about our development efforts or want to contribute 

1. irc channel  #imx6-dongle on freenode
2. Kernel/Uboot Source 
3. Wiki Page
4. Google Group

I've called this a preview image because it's still work in progress. What's working:

1. New uboot - based on abrasive's (aka James Laids) excellent work.
2. GPU and VPU h/w acceleration
3. Working wifi (although performance can be below par)
4. Working internal/external SD slots.
5. Working usb ports.

Instructions:

1. Download image (thanks to miniand.com for hosting).

2. Unzip image and dd to an SD card. This image is for a 8GB SD card, however the ext4 file partition is only 3GB therefore should work on a 4GB card. Fix the partition (by expanding it) after completing the dd.

3. Download a new uboot and 'dd' to your sd card (replace <drive> with the correct value):

    sudo dd if=u-boot.imx bs=1k seek=1 of=/dev/<drive> && sync

Update: To fix the problem of sound not working, down a pre-built kernel with the fix or compile your own using the our latest kernel source. To use pre-built follow instructions below:

3a. Down the pre-built kernel with cpu frequency scaling enabled or without it and 'dd' to sd card. Replace <cpu_freq_option> with cpu_freq or no_cpu_freq depending on which file you downloaded :

    sudo dd if=uImage_3.0.35-0269_<cpu_freq_option> of=/dev/<drive> bs=1048576 seek=1 && sudo sync 
                                                   
3b. Download the kernel modules for the prebuilt kernel and copy to the sd card (replace <sd card> with mount point of your sd card:

 tar xvf modules_3.0.35-02695.tar
 cp -r modules/3.0.35-02695-ga09806b-dirty <sd card>/lib/modules

4. Place image in the internal sd card slot (you need to remove the casing to access the internal sd slot) and fingers crossed it should boot (useful to have a serial console open). The image defaults to 1280x720 screen resolution, once the desktop appears, plug-in a keboard/mouse via the usb port.

5. Next configure wifi, and it may be useful to reboot after setting wifi so that the correct time is picked up.

6. Then enjoy the desktop experience!

Unfortunately shutting down from the desktop just takes you back to the logon screen. To force a  proper shut down open a command shell and issue "sudo shutdown -P now", wait a minute or so to ensure shut down is complete and then remove the usb power cable.

To verify GPU acceleration you can run glmark2-es or es2gears. To verfiy VPU run totem with a file of your choice.

Saturday 2 March 2013

GK802 - Ubuntu Update 1 (GPU/VPU Acceleration)

Since my last post, we have made rapid progress in getting a functional kernel working on the GK802. This couldn't have been done without the invaluable contributions from rz2k (aka Dmitriy ) and abrasive (aka James Laird)  on the irc channel imx-dongle. Coupled with countless hours from myself the progress so far:

1. Wifi working.
2. External SD working
3. Matched IOMUX configuration to align with the Android image. Managed to work out how compile        C programs to run under the Android image.
4. Stripped out unnecessary device initialisation from the original HDMI dongle source.
5. Enabled EGL and GLES HW Acceleration in Ubuntu (big thanks r2zk).
6. Unity desktop I think is partially HW accelerated.

I plan to push kernel patches in the coming days. There is still a fair amount of work to do due to  thermal/CPU freq driver patches in the kernel and lack of PMIC on the GK802

Update: Changes are now merged into the main repo https://github.com/imx6-dongle/linux-imx. If you want to build the kernel then use imx6_gk802_defconfig.

Here's a video to demonstrate what's been achieved and how capable the IMX6Q is. In the video Firefox seems sluggish, however this is easily compensated by the fact I run glmark-es2 whilst simultaneously playing a 720p video. 


Compared to the Chinese SOC manufactures it is miles ahead in the availability of reference documentation and Linux support. The video playback is pretty impressive and I hope that we will see XBMC development commence at some point.


Friday 15 February 2013

I.MX6 GK802/Hi802 - A working Kernel with Ubuntu

The Hi802/GK802 mini-pcs are interesting devices because of the vast reference documentation available for the IMX6Q processor. Freescale are also providing a HDMI TV Dongle reference design complete with source code, the Hi802/GK802 are partially based on this design. With this is mind and after spending many hours decoding the pcb layout coupled with bouts of head scratching, I finally got a kernel booting ubuntu. This is a work in progress but hopefully will kick start further development by community see here. Considering this is work in progress you definitely require serial console access if booting fails. Furthermore I'm testing on a GK802 with 1.2 CPU version therefore no guarantee on a 1.1 CPU which I think are GEN 1 or for Hi802 devices.


1. Kernel Boots from SD card.
2. USB port functions with USB hub (for me works with keyboard and mouse).
3. Serial console shell active.
4. HDMI output is set to 1280x720@60.
5. Ubuntu Desktop launches but freezes randomly :(. Not that use-able in its current state.
6. No wifi or bluetooth. Wifi shouldn't be too hard to add.

So if your keen or want to help out, instructions below, I assuming you know how to use git and have armel compiler (I use arm-linux-gnueabi-) :

1. Check out the Freescale imx6 kernel tree and checkout imx_3.0.35_1.1.0. I found 1.1.0 to be more stabe than the 2012-09-01 branch.

    cd linux-2.6-imx
    git checkout imx_3.0.35_1.1.0
          
2. Down this tar file containing patches and kernel config (thanks to miniand.com for provding hosting). Extract and apply patches

    git apply gk802_patch_1.patch
    git apply gk802_patch_2.patch

3. Make kernel config

    make ARCH=arm imx6_defconfig
    make ARCH=arm menuconfig
        
4. Copy the file kernel_config to .config 

    cp kernel_config .config

5. Build the kernel and modules

    make ARCH=arm CROSS_COMPILE=arm-linux-gnueabi- uImage
    make ARCH=arm CROSS_COMPILE=arm-linux-gnueabi- INSTALL_MOD_PATH=output      modules     
    make ARCH=arm CROSS_COMPILE=arm-linux-gnueabi- INSTALL_MOD_PATH=output modules_install

6. Download the rootfs L3.0.35_1.1.0_UBUNTU_RFS from the freescale website. You may need to create an account to access to the files.

7. To create a bootable SD card, I took the bare ubuntu image from here (thanks ArmTvTech.com and   dylandn ) and dd'd this to the card. I then reformated the ext4 partition and untar'd the rootfs 
L3.0.35_1.1.0_UBUNTU_RFS to it.

8. Next step is to copy the new kernel and modules over:

    sudo dd if=arch/arm/boot/uImage of=/dev/<device> bs=1048576 seek=1 && sudo sync

    sudo cp -r output/lib/modules/3.0.35-05236-gc9dfae3-dirty /media/ubuntu/lib/modules


9. Now try to boot, fingers crossed you should see the kernel trace output appearing and finally a command shell in the serial console.

generic-usb 0003:413C:2107.0002: input,hidraw1: USB HID v1.10 Keyboard [Dell Dell USB Entry Keyboard] on usb-fsl-ehci.0-1.4/input0
EXT4-fs (mmcblk0p1): couldn't mount as ext3 due to feature incompatibilities
EXT4-fs (mmcblk0p1): couldn't mount as ext2 due to feature incompatibilities
EXT4-fs (mmcblk0p1): mounted filesystem with ordered data mode. Opts: (null)
VFS: Mounted root (ext4 filesystem) on device 179:1.
Freeing init memory: 184K
 * Starting mDNS/DNS-SD daemon[ OK ]
 * Starting load fallback graphics devices[ OK ]
 * Starting Userspace bootsplash[ OK ]
 * Stopping load fallback graphics devices[ OK ]
 * Starting configure network device security[ OK ]
 * Starting Mount network filesystems[ OK ]
 * Starting Upstart job to start rpcbind on boot only[ OK ]
 * Stopping Upstart job to start rpcbind on boot only[ OK ]
 * Starting network connection manager[ OK ]
 * Stopping Mount network filesystems[ OK ]
 * Starting Failsafe Boot Delay[ OK ]
 * Stopping Failsafe Boot Delay[ OK ]
 * Starting System V initialisation compatibility[ OK ]
 * Starting configure network device[ OK ]
 * Starting Bridge socket events into upstart[ OK ]
 * Starting RPC portmapper replacement[ OK ]
 * Starting Start this job to wait until rpcbind is started or fails to start[ OK ]
 * Stopping rpcsec_gss daemon[ OK ]
 * Stopping Start this job to wait until rpcbind is started or fails to start[ OK ]

[ OK ]rting Advanced Power Management daemon...        
Last login: Thu Jan  1 00:00:41 UTC 1970 on tty1
speech-dispatcher disabled; edit /etc/default/speech-dispatcher
Checking for running unattended-upgrades: 
[ OK ]rting bluetooth        
 * PulseAudio configured for per-user sessions
saned disabled; edit /etc/default/saned
 1 Jan 01:36:59 ntpdate[5241]: no servers can be used, exiting
Welcome to Linaro 11.10 (development branch) (GNU/Linux 3.0.35-02666-gc27cb38-dirty armv7l)

 * Documentation:  https://wiki.linaro.org/

301 packages can be updated.
53 updates are security updates.

New release '12.04 LTS' available.
Run 'do-release-upgrade' to upgrade to it.

root@linaro-ubuntu-desktop:~# 


10. Your HDMI display should show a Ubuntu desktop after a while. If the desktop appears then try launching a terminal window which should appear without it freezing. Once the deskop freezes it can be recovered in the serial console shell by:

    service lightdm stop
    service lightdm start

Xorg is reporting the following error when frozen:

[    71.433] (II) XKB: reuse xkmfile /var/lib/xkb/server-A77BBE312A49C9FE89948D38B2A8CB84C3CBB410.xkm
[   101.398] (II) XKB: reuse xkmfile /var/lib/xkb/server-A77BBE312A49C9FE89948D38B2A8CB84C3CBB410.xkm
[   181.556] [mi] EQ overflowing. The server is probably stuck in an infinite loop.